
An air conditioner condenser leaking is more than just a minor inconvenience. It can signal serious underlying issues that, if left unaddressed, may lead to costly repairs or complete system failure. Whether it's refrigerant, water, or oil dripping from your unit, identifying the root cause is the first step toward a lasting fix. At BlueStars Parts, we specialize in high-quality replacement components that help you quickly and reliably restore your AC system to peak performance.
1. AC Condenser Leak: DIY Fix or Professional Repair?
Not every air conditioner condenser leaking requires a service call, but misidentifying the type of leak you're dealing with can cost you far more in the long run. Use the table below to identify your situation at a glance before deciding on your next step.
|
Cause |
DIY or Professional Repair |
Difficulty |
Urgency |
|
Normal condensation or rainwater |
DIY |
Easy - Monitor only |
Low |
|
Poor drainage around the condenser |
DIY |
Easy - Site cleanup and grading |
Low |
|
Uneven or sinking condenser pad |
Professional Repair |
Moderate - Unit too heavy to reposition safely |
Medium |
|
Dirty condenser coil |
DIY (light cleaning) / Professional Repair (severe buildup) |
Easy to Moderate |
Medium |
|
Damaged service valve or loose fittings |
Professional Repair |
Complex - Refrigerant handling is regulated by law |
High |
|
Refrigerant line leak |
Professional Repair |
Complex - Risk of compressor damage if delayed |
High |
|
Leaking condenser coil |
Professional Repair |
Complex - May require coil or full unit replacement |
High |
>>> Read more: My Air Conditioner is Leaking Water: 6 Causes and Fixes
2. Why Is Your Air Conditioner Condenser Leaking?
If you notice moisture around your outdoor condenser, don’t panic yet. It may be normal condensation, rainwater, poor drainage, or a tilted pad — but oily residue, hissing sounds, ice, or weak cooling can point to a serious refrigerant leak.
-
Water-related (minor): Normal condensation, rainwater, poor drainage, uneven or sinking pad
-
Performance-related: Dirty condenser coil causing system strain
-
Refrigerant leaks (serious): Damaged service valve, refrigerant line leak, leaking condenser coil
Start by checking the simple water-related causes first, then move toward coil condition and refrigerant-related problems if the leak continues or your AC performance drops.
>>> Read more: 12 Common AC Problems and How to Troubleshoot Them
2.1 Normal condensation or rainwater around the unit
During normal cooling, a small amount of moisture around the outdoor condenser is usually normal, especially on humid days or after rain. It’s not a concern if it appears as a small damp patch, a few droplets, or a shallow puddle under 6-12 inches wide that dries within 30-60 minutes after the AC stops. However, check the unit if the puddle is larger than 1-2 feet wide, lasts for hours in dry weather, or keeps returning when the AC is off.
How to Fix: Monitor the unit across a few operating cycles. If the moisture disappears shortly after the unit stops running or clears up once the rain passes, no action is needed. Only move on to the causes below if puddles persist during dry weather with no clear explanation.
Elevate the outdoor unit above ground level where possible. This prevents contact with puddles, rain runoff, and snow buildup, protecting your equipment from unnecessary moisture exposure over time.

Condensation naturally occurs when warm air passes over the cold condenser coils (Source: Bluestars Parts)
2.2 Poor drainage around the condenser
Even when the unit itself is in perfect working order, water can accumulate if the surrounding ground doesn't allow proper runoff. Compacted soil, flat concrete slabs, or nearby landscaping can trap moisture directly beneath the condenser, making it look like a system leak when it's simply a site drainage problem. Over time, persistent standing water can accelerate corrosion of the unit's base and electrical components.
How to Fix: Clear away leaves, debris, and overgrown vegetation around the unit, then check whether the surrounding ground slopes slightly away from the condenser base. If water continues to collect, adding a gravel drainage bed beneath the unit is an effective and low-cost long-term solution.
Maintain at least two feet of clearance around your condenser on all sides. This supports both proper airflow and drainage, reducing the risk of moisture-related issues and keeping the unit running efficiently.
2.3 Uneven or sinking condenser pad
Concrete pads can sink, shift, or become uneven over time, causing the outdoor condenser to tilt instead of sitting level. When this happens, water may not drain away properly and can collect around the unit. A tilted condenser can also put extra stress on refrigerant lines and internal parts, increasing the risk of leaks later.
Common warning signs include:
-
Noticeable vibration when the AC is running
-
A tilted or uneven fan guard
-
Rattling refrigerant lines or unusual metal noises
-
Water collecting on one side of the unit base
How to Fix:
-
Check the level first: Turn off the unit at the breaker, then use a spirit level to check all four sides of the condenser base. Even a subtle tilt is worth addressing before it worsens.
-
Re-level with professional help: If the pad has shifted, a technician can re-level the unit using rubber shims or replace the pad entirely. Do not attempt to reposition the unit yourself. Condensers weigh several hundred pounds, and the refrigerant lines can be damaged in the process.
-
Inspect for secondary damage. Once the unit is level again, have a technician check the refrigerant lines and fittings for any stress-related wear that may have developed while the unit was tilted.
CAUTION: Addressing an uneven pad early is far cheaper than dealing with the refrigerant line damage it can eventually cause. If you've noticed the unit tilting, don't wait, a simple re-leveling job now can prevent a costly repair later.
2.4 Dirty condenser coil causing system pressure issues
A dirty condenser coil blocks heat from leaving the outdoor unit. Instead of cooling efficiently, the system works harder, runs hotter, and may develop pressure-related problems over time. This does not always mean the coil is leaking yet, but it can make the AC look and feel like something is seriously wrong.
Common visible signs include:
-
Weak or warm air from the vents
-
Short cycling, where the AC turns on and off too often
-
Unusually high electric bills
-
Debris, dust, grass, or cottonwood buildup on the outdoor coil
How to Fix:
-
Cut power first: Turn off the unit at the breaker before touching anything. Never clean the condenser while it's running, the fan blades and electrical components pose a serious safety hazard.
-
Rinse the coil gently: Use a garden hose to spray the condenser fins from the inside out, pushing debris outward rather than further into the coil. Keep the pressure low and steady to avoid bending the delicate aluminum fins.
-
Use a coil cleaner for heavier buildup: Apply a dedicated no-rinse coil cleaner spray, allow it to foam and loosen the grime, then rinse thoroughly. For severe buildup, this step is best handled by a professional to avoid accidental fin damage.
After cleaning, turn the AC back on and watch how it runs. If the system still struggles to start, blows weak warm air, or keeps short cycling, prolonged overheating may have already damaged startup components such as the dual run capacitor.
If the capacitor needs replacement, the 40+5 uF 40/5 MFD 370V or 440 Volt VAC Round Dual Run Capacitor Dual Run Circular Start Capacitor is a reliable, universal-fit option compatible with most AC and heat pump condensers, and backed by a lifetime warranty so you're covered long after the repair is done.
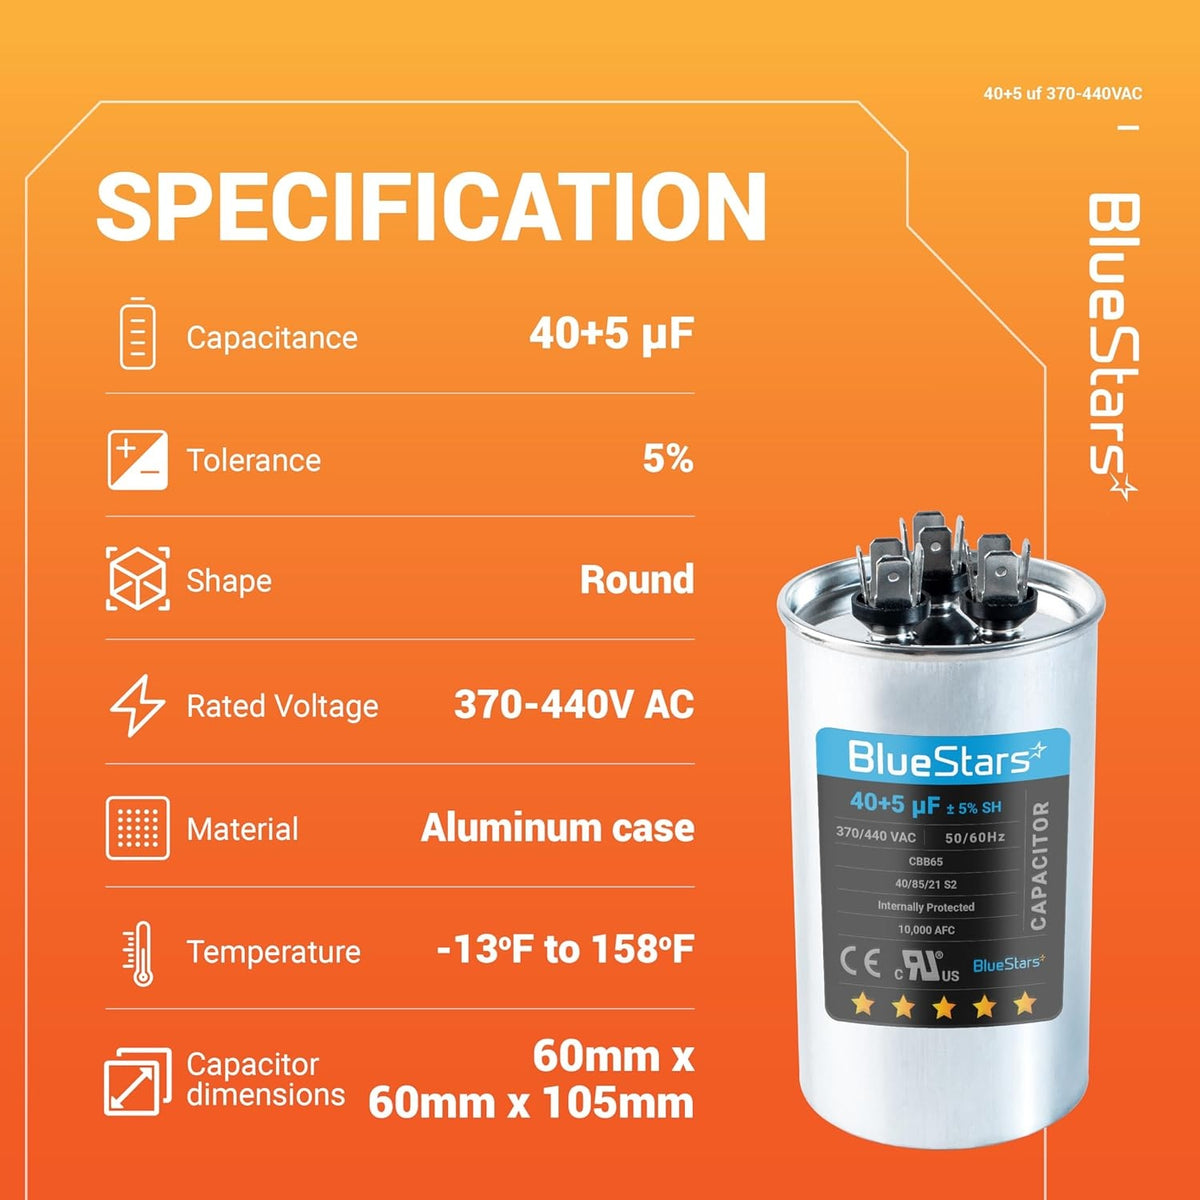
The 40+5 uF 40/5 MFD 370V or 440 Volt VAC Round Dual Run Capacitor Dual Run Circular Start Capacitor (Source: Bluestars Parts)
2.5 Damaged service valve or loose fittings
Service valves and fittings are among the most common air conditioner condenser leaking points in an outdoor condenser. Over time, vibration from normal operation can gradually loosen connections, while age-related wear weakens the valve seals themselves. Oily residue near the fittings is a telltale sign, it indicates that refrigerant oil is escaping, and wherever refrigerant oil goes, refrigerant gas follows.
How to Fix:
-
Inspect visually before calling anyone: Look closely around the service valve area and line connections for oily stains, frost patches, or discoloration. If you see any of these signs, note the location and turn the unit off at the breaker immediately.
-
Hand-tighten valve caps if accessible: Valve caps can sometimes loosen from vibration alone, snugging them back down by hand is a safe, simple first step and may temporarily reduce the leak rate while you arrange a service call.
-
Call a licensed HVAC technician for the repair: A professional will pressure-test the system, reseal or replace the faulty valve or fitting, evacuate the system, and recharge refrigerant to the correct specification.
CAUTION: Refrigerant handling, pressure testing, and recharging are regulated in most jurisdictions and require certified technicians. Recovered refrigerants must also be properly disposed of, never vented to the atmosphere. Attempting to recharge the system yourself without fixing the leak first will only mask the problem temporarily and risk damaging the compressor.
2.6 Refrigerant line leak
An air conditioner condenser leaking from the line is a serious issue because the AC cannot cool properly when refrigerant levels drop too low. Do not keep running the system if you suspect this problem. Running an AC low on refrigerant can overheat and destroy the compressor, turning a repairable leak into one of the most expensive AC failures.
These leaks can happen due to age, corrosion, vibration, or pet urine near the outdoor unit. Since refrigerant lines carry pressurized refrigerant between the indoor and outdoor units, warning signs often include hissing sounds, oily residue, ice on the tubing, and weak cooling.
How to Fix:
-
Shut the system down immediately: Turn the unit off at both the thermostat and the breaker. Continuing to run the system with a refrigerant leak can cause severe and expensive compressor damage within a short period of time.
-
Do not attempt to add refrigerant yourself: Handling refrigerant without EPA Section 608 certification is illegal, and adding refrigerant to a leaking system without repairing the leak first only delays the inevitable while making the problem worse.
-
Call a certified HVAC technician: A licensed technician will locate the leak using an electronic leak detector, UV dye, or a nitrogen pressure and soap bubble test, then repair or replace the leaking section, evacuate the system, and recharge it to the manufacturer's exact specification.
CAUTION: A refrigerant line leak doesn't fix itself and won't slow down on its own. The longer the system runs in this condition, the greater the risk of permanent compressor failure, which can cost as much as replacing the entire outdoor unit. Act quickly.
2.7 Leaking condenser coil
Corrosion is one of the most common causes of air conditioner condenser leaking. Over time, moisture, dirt, and airborne chemicals can weaken the coil’s metal surface, creating small openings where refrigerant escapes. Once the coil itself starts leaking, cooling performance can drop quickly, and the system may fail if the issue is ignored.
Before deciding between repair and replacement, consider the unit’s age, efficiency, and refrigerant type. A newer system with a small, accessible leak may still be worth repairing. However, if the AC is over 10-12 years old, has a low SEER rating, uses older R-22 refrigerant, or has multiple leak points, replacing the coil or outdoor unit may be more cost-effective.
How to Fix:
-
Turn off the system and call a professional: A leaking condenser coil is not a DIY repair. Turn the unit off at the breaker and schedule a diagnostic visit with a licensed HVAC technician as soon as possible.
-
Have the technician assess repairability: A small leak at an accessible joint is often repairable. The technician locates the damaged section, performs the repair, pressure tests the coil, and recharges the refrigerant. This approach works best on systems under ten years old, where the rest of the equipment remains in good condition.
-
Consider coil or unit replacement for older systems: For extensively corroded coils or multiple leak points, full coil replacement or a new outdoor unit is typically the more cost-effective long-term solution, especially if repair costs approach 50% of a new unit's price.
CAUTION: Never recharge refrigerant without first repairing the leak, doing so simply wastes refrigerant and masks the underlying problem until the system fails more severely. If your condenser coil is leaking and the unit is over 10–12 years old, use this as an opportunity to evaluate whether a full replacement might save you more money in the long run.

Corrosion is one of the most common causes of condenser coil leaks (Source: Bluestars Parts)
>>> Read more: AC Stopped Working Suddenly? Try These Quick Fixes
3. AC Condenser Leak Repair Cost
AC condenser leak repair costs vary depending on whether the issue is simple water drainage, a loose fitting, a refrigerant line leak, or a damaged condenser coil. Minor water-related problems are usually cheaper to fix, while refrigerant leaks and coil damage require a licensed HVAC technician and can become much more expensive.
In most residential HVAC systems, the final price depends on the leak location, refrigerant type, system age, warranty coverage, and local labor rates. Use the table below as a general estimate before requesting a quote.
|
Repair/Service Type |
Estimated Cost (USD) |
|
Drainage cleanup or minor site correction |
$75 - $250 |
|
Condensate drain line flush |
$75 - $250 |
|
Refrigerant leak detection |
$100 - $450 |
|
Service valve or fitting repair |
$150 - $500 |
|
Refrigerant line repair |
$200 - $1,500 |
|
Refrigerant recharge after leak repair |
$150 - $500 |
|
Condenser coil repair or replacement |
$900 - $2,400 |
|
Outdoor condenser unit replacement |
$1,200 - $6,100 |
|
Full central AC system replacement |
$4,000 - $8,000+ |
If your AC is more than 10-12 years old, uses older R-22 refrigerant, or needs a major coil or compressor repair, replacement may be more cost-effective than repeated leak repairs.
Cost note: Residential HVAC repair costs vary by leak location, refrigerant type, system age, and local labor rates. Angi (2026) estimates AC refrigerant leak detection at $100-$450, refrigerant line repair at $200-$1,500, condenser coil repair or replacement at $900-$2,400, and refrigerant recharge at $150-$500.
If your cooling system is not working as efficiently as it should, replacing worn or faulty components can help restore performance and extend the life of your unit. BlueStars Parts offers a wide selection of reliable air conditioner parts, making it easier to find the right replacement parts for common AC repair and maintenance needs.
4. Frequently Asked Questions
4.1. Is it normal for an AC condenser to leak?
Yes, a small amount of water around the outdoor condenser can be normal, especially on humid days or after rain. However, large puddles, water that stays for hours, oily residue, ice, or weak cooling may signal a drainage or refrigerant leak issue.
4.2. Can I still run my AC if it's leaking water?
You can monitor the unit if the moisture is minor and dries within 30-60 minutes after the AC stops. If water keeps pooling, the leak appears during dry weather, or cooling performance drops, turn the system off and inspect the cause before running it again.
4.3. Should I repair or replace a leaking AC condenser?
Repair is usually enough for minor drainage problems, loose fittings, or small accessible leaks. Replacement may be more cost-effective if the unit is over 10-12 years old, uses older refrigerant, has multiple leak points, or the repair cost is close to 50% of a new unit.
In conclusion, dealing with an air conditioner condenser leaking issue early can help prevent costly repairs, water damage, and reduced cooling performance. If you need reliable replacement parts and accessories for your air conditioning system, Bluestars Parts offers a wide selection of high-quality components designed to help restore your unit’s performance and extend its lifespan.
Contact information:
8 The Green, Ste A, Dover, Delaware 19901-3618, United States
Website: https://bluestarsparts.com/
Explore related articles:
Why is my AC fan not working? Common Causes and How to fix
Can I Replace My AC Capacitor Myself? Quick DIY Guide
AC Running But Not Cooling: 6 Common Causes and Fixes
Why Does Your Air Conditioner Smell Bad? Causes and Fixes
AC Stopped Working Suddenly? Try These Quick Fixes
Reference:
Angi. (2026). How much does AC Freon leak repair cost?