
If your reel mower starts cutting unevenly or tearing grass instead of slicing it cleanly, the blades may need attention. Learning how to sharpen reel mower blades can help improve cutting performance, protect lawn health, and keep the mower working more smoothly. In this guide, BlueStars Parts walks you through the key steps to sharpen and check your reel mower blades correctly.
| Key Takeaway |
|---|
|
Sharpening reel mower blades is usually done through backlapping, which helps restore a cleaner cutting edge without removing the blades. In this guide, you will learn how to: • Prepare the mower safely before sharpening • Clean the blades and apply sharpening compound properly • Check reel-to-bed knife contact after sharpening • Test cutting performance after the final cleanup • Identify when poor cutting may be caused by another worn part |
1. Quick signs your blades need sharpening
Knowing when to sharpen your blades helps keep your machine running smoothly and prevents damage to other parts. Instead of waiting for serious issues, you can spot a few clear and easy signs during normal use.
-
Poor cut quality (easiest to notice): Cuts look rough, uneven, or torn instead of clean and smooth. This is usually the first and most obvious sign your blades are dull.
-
Unusual noise or vibration: If the machine becomes louder or starts shaking more than normal, dull blades may be causing extra strain and unstable operation.
-
Reduced cutting performance: The machine takes longer to finish tasks or feels weaker than before. Dull blades require more effort to get the same result.
-
Frequent jamming during operation: Material gets stuck more often because the blades can’t cut through cleanly, leading to buildup and interruptions.
-
Visible wear or damage on blades: Chips, cracks, or rounded edges are clear signs the blades need attention, even if performance hasn’t dropped too much yet.
2. Tools and materials needed to sharpen reel mower blades
Before you begin, it helps to know which tools are essential and which ones are only helpful for convenience. The table below groups each item by purpose and level of necessity so you can prepare more easily before sharpening your reel mower blades.
| Tool / Material | Purpose | Level of necessity |
|---|---|---|
|
Sharpening compound |
Used for backlapping the reel blades without removing them |
Must-have |
|
Brush or rag |
Cleans off dirt, grass, and old residue before and after sharpening |
Must-have |
|
Screwdriver / wrench |
Helps adjust reel-to-bed knife contact |
Must-have |
|
Protective gloves |
Protects your hands while working near the blades |
Must-have |
|
Hand crank or drill adapter |
Makes it easier to rotate the reel backward during sharpening |
Optional |
|
Lubricating oil |
Helps protect metal parts and reduce friction after sharpening |
Optional |
|
Safety glasses |
Protects your eyes from dust or compound particles |
Optional |
|
Bucket of water |
Helps rinse off debris and leftover compound during cleanup |
Nice-to-have |
Even if you do not have specialized equipment, you can still sharpen reel mower blades at home with a few basic tools. While the process may take more time without helpful add-ons like a drill adapter, it can still be effective when done carefully and evenly.
-
Sharpening compound
-
A simple screwdriver or wrench
-
A brush or cloth
-
Protective gloves
With just these essentials, you can manually rotate the reel and apply the compound for backlapping. While it may take more time compared to using a drill adapter, this method is still effective when done carefully and evenly.
2. How to sharpen reel mower blades: step-by-step
Sharpening reel mower blades doesn’t require removing them if you follow the backlapping method. Below is a detailed, step-by-step guide to help you do it correctly and safely.
2.1. Prepare the mower
Place your reel mower on a flat, stable surface before you begin sharpening. Make sure the mower is secure and will not move during the process. If needed, slightly loosen the reel so it can rotate more freely, and wear protective gloves before handling the blades. A properly prepared mower should:
-
Stay stable without shifting
-
Allow the reel to turn by hand with light resistance
-
Rotate evenly without wobbling or grinding

Secure the mower and adjust the reel safely (Source: BlueStars Parts)
2.2. Clean the blades
Use a brush or cloth to remove grass clippings, dirt, and debris from the reel and bed knife before applying sharpening compound. Cleaning the blade area first helps the compound spread more evenly and prevents buildup from affecting the sharpening result. A properly cleaned blade area should:
-
Have clearly visible blade edges and bed knife contact points
-
Feel free of thick residue or gritty buildup
-
Allow the sharpening compound to spread evenly without clumping
2.3. Sharpen the blades
Apply a thin, even layer of sharpening compound across the reel blades, then rotate the reel backward using a hand crank, drill adapter, or by hand. Continue rotating for several minutes so the compound can work evenly between the reel and the bed knife. Reapply a small amount if needed to keep the contact area covered. A properly sharpened reel should:
-
Begin with a rough grinding sound that gradually becomes lighter and more even
-
Rotate more smoothly as the compound works across the contact surface
-
Show more consistent contact between the reel and bed knife

Apply compound and rotate the reel backward to sharpen (Source: BlueStars Parts)
2.4. Check reel-to-bed knife contact
After sharpening, slowly rotate the reel forward and check the contact between the reel and the bed knife. If the contact feels uneven, adjust both sides little by little until the reel makes light, consistent contact across the full width. You can also use a paper test to confirm whether the reel is cutting cleanly. A correct adjustment should:
-
Produce light, even contact across the full width of the reel
-
Avoid tight spots, dragging, or loose gaps in the rotation
-
Cut paper cleanly at several points along the blade
2.5. Final clean and test
After sharpening, clean the blades thoroughly to remove any remaining compound and debris. Make sure the mower is completely dry, then apply a light layer of lubricating oil if needed to help protect the metal parts and keep the reel moving smoothly. Finally, test the mower on a small patch of grass to see whether the cutting result has improved.
-
If the cut still looks uneven, check the reel-to-bed knife alignment again to make sure the contact is even across the full width.
-
If the cutting result is still poor after adjustment, the blades may be too worn and may need deeper sharpening or professional grinding.
-
If performance still does not improve after that, inspect other parts that may affect blade movement and cutting consistency. For example, a worn GX20072 Lawn Mower Deck Belt can reduce blade rotation and may need to be replaced if the drive system shows signs of wear.
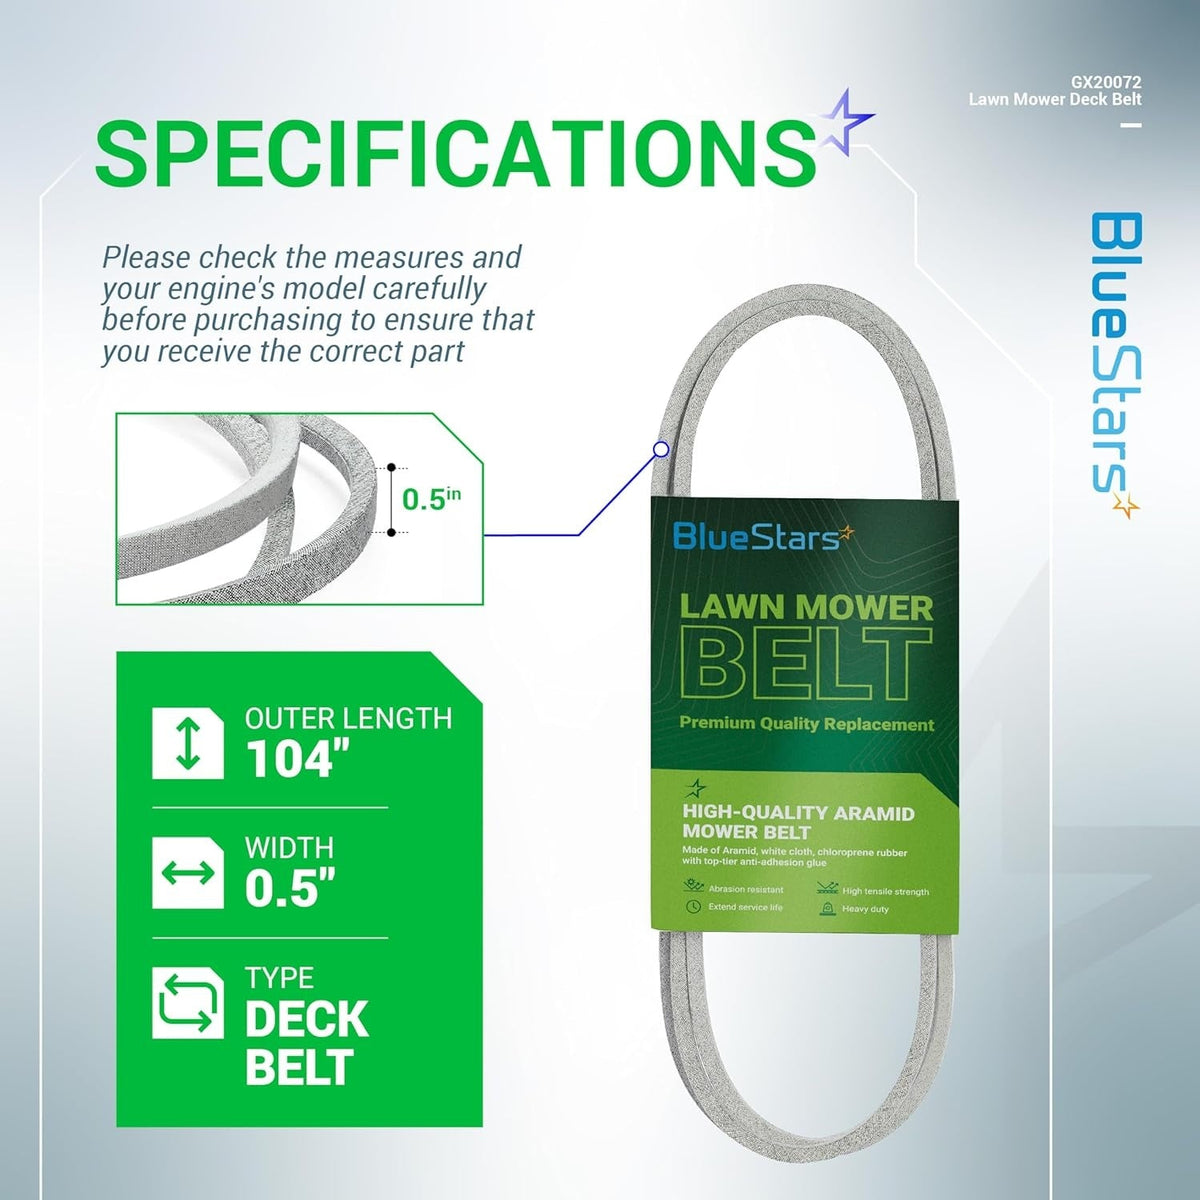
Durable drive belt ensures smooth and reliable blade rotation (Source: BlueStars Parts)
3. When to Sharpen Your Reel Mower Blades
Knowing when to sharpen your reel mower blades is essential for maintaining a clean, scissor-like cut and keeping your lawn healthy. Regular maintenance also helps extend the lifespan of your mower.
-
Every 20–25 hours of use or at least once per season: For most homeowners, sharpening once per year is sufficient. However, frequent use may require more regular maintenance to keep blades performing efficiently.
-
When grass appears torn or discolored: If grass tips look white, brown, or frayed instead of cleanly cut, the blades are likely dull and need sharpening.
-
Uneven or reduced cutting performance: If the mower starts pulling or ripping grass, or leaves uneven patches, it may indicate dull blades or improper alignment.
-
Fails the paper test: A properly adjusted reel mower should cut through a strip of paper cleanly. If it cannot, sharpening or adjustment is needed.
-
After hitting debris or visible damage: Contact with rocks or sticks can cause nicks or dents. Over time, the reel may also develop a tapered (cone-shaped) wear pattern that affects cutting accuracy.
-
More frequent sharpening in sandy conditions: Lawns with sandy or gritty soil may require sharpening every 10–15 hours of use, as sand wears down the blades more quickly.
-
When backlapping no longer improves performance: Backlapping helps maintain sharpness, but if it no longer improves cutting performance, a more thorough sharpening or professional grinding may be required.

4. Frequently asked questions
4.1. How often should I sharpen reel mower blades?
Reel mower blades should generally be sharpened every 20–25 hours of use or once per season for typical residential lawns. If you mow frequently or deal with sandy soil or debris, sharpening may be needed more often to maintain a clean, scissor-like cut.
4.2. Can I sharpen blades without removing them?
Yes, you can sharpen reel mower blades without removing them using backlapping, which is ideal for quick, in-season touch-ups. However, this method is generally less precise than full sharpening and is best for maintaining the edge rather than restoring heavily worn blades. Always make sure the mower is safe and secured before working near the blades.
4.3. Do I need special tools to sharpen blades?
Yes, using the right tools is recommended for effective blade sharpening. For reel mowers, basic tools like sharpening compound and a hand crank are sufficient for routine backlapping. However, for more precise sharpening or heavily worn blades, professional equipment may be required to properly restore the cutting edge and ensure long-term performance.
Knowing how to sharpen reel mower blades is essential for maintaining a clean, precise cut and keeping your lawn healthy. With simple steps like cleaning, backlapping, and proper adjustment, you can improve cutting performance and extend the life of your mower. Regular maintenance, along with checking key components when needed, ensures your mower operates smoothly and efficiently. For reliable parts and trusted maintenance solutions, BlueStars Parts offers everything you need to keep your equipment in top condition.
Contact information:
8 The Green, Ste A, Dover, Delaware 19901-3618, United States
Website: https://bluestarsparts.com/
Explore related articles
How to Replace a Drive Belt on a Riding Mower? Step-by-step
How to replace a spark plug on a lawn mower in 7 easy steps