


Lifetime Warranty
W10745655 Dryer Timer for Maytag Whirlpool Crosley Amana 230VAC 60Hz Dryer Models
Save 13%
0.00
Regular price
$40.80
Regular price
$46.92
Sale price
$40.80
Fast delivery
CONFIRM THE FIT FOR YOUR MODEL
Enter your model number
W10745655 Dryer Timer Control
Key Features
- Cycle Control Logic: Manages the operational timing for various drying modes, including Automatic Dry, Timed Dry, and Air Fluff settings.
- High-Voltage Compatibility: Specifically rated for 230VAC 60Hz electrical systems used in high-capacity residential dryers.
- Integrated Advance Motor: Features an internal synchronous motor that ensures the timer dial moves consistently through each phase of the laundry cycle.
- Reliable Switching: Built with heavy-duty internal contacts to handle the electrical loads for the heating element, drive motor, and signal systems.
Replaces / Cross-Reference Part Numbers
- WPW10745655
- AP6003908
- PS11731366
- W10857612
- W10436308
- 4454384
- EAP11731366
- PD00029500
- W11043389
- W10857612VP
Compatibility & Fitment
This timer is compatible with various 29-inch wide dryers from the Whirlpool family of brands, specifically those configured for 230V operation. Key compatible models include:
- Amana: YNED4655EW1, NED4655EW1, NGD4655EW1.
- Whirlpool: 4KWED4605FW0, WED4616FW0, WGD4616FW0.
- Maytag: Compatible with select Centennial and Bravos series dryers.
- Crosley: Fits select models utilizing the W10745655 part specification.
- Roper & Admiral: Compatible with standard top-load matching dryer units using the corresponding part number.
When to Replace
- Timer Stalls: The dryer runs continuously because the timer dial fails to advance toward the "Off" position.
- No Start Condition: The timer fails to complete the electrical circuit to the motor or heater when the start button is depressed.
- Heater Won't Engage: The dryer spins but the air remains cold, and the timer is found to be not sending voltage to the heating circuit.
- Mechanical Stripping: The internal gears have failed, causing the timer knob to feel loose or spin without engaging the switch.
- Burned Contacts: Visible arcing or a burnt smell originating from the timer housing within the control console.
Installation Tips
- Safety First: Ensure the dryer is completely disconnected from the 240V/230V power supply before beginning work.
- Documentation: Take a photo of the wire harness and individual wire colors connected to the back of the old timer to ensure correct orientation on the new part.
- Terminal Transfer: Use needle-nose pliers to move the female spade connectors one by one from the old timer to the new one to avoid any wiring mistakes.
- Knob Handling: Carefully pull the timer knob straight off the shaft. If it is stuck, check for a small locking pin or clip on the back of the console.
- Post-Repair Test: Once the console is reassembled, run a 10-minute "Timed Dry" cycle to ensure the motor starts and the dial moves as expected.


-

COPPER WIRE MOTOR
Dual-speed copper motor ensures quiet, precise timing, lasting performance without overheating. -

COPPER ALLOY CONTACTS
Corrosion-resistant copper contacts deliver stable electrical flow for enhanced safety. -

DURABLE ABS HOUSING
Robust ABS casing protects internal parts from heat damage, extending timer life. -

STEEL BACK PLATE
Precision-fit reinforced steel bracket allows easy installation and perfect alignment.

WIDE COMPATIBILITY
The W10745655 replaces part numbers W10857612 WPW10745655 418-619-20-B5 AP6003908 PS11731366 162-724-AM 4454384 PD00029500 EAP11731366 FIX11731366. It is compatible with Maytag, Whirlpool, Crosley, Amana, Admiral, Roper, and Inglis dryer models.

IMPORTANCE NOTE
Our W10745655 Dryer Timer ensures perfect drying cycles with reliable motor-driven gears that control heat, timing, and automatic shut-off for safer dryer operation. Some parts may look similar, but might not fit your dryer. Please confirm the compatibility before purchasing.
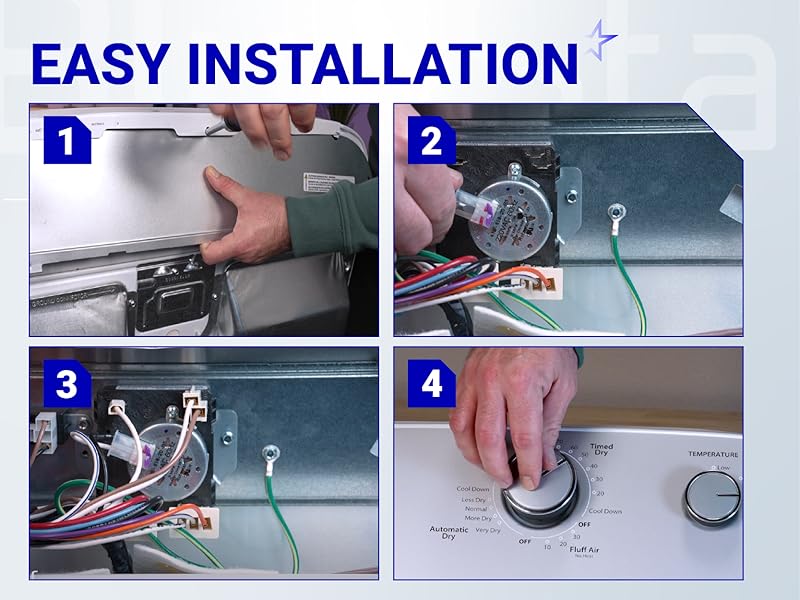
4 SIMPLE STEPS
1. Turn off power dryer. Remove back screws to access panel; 2. Take photo of wire setup. Carefully disconnect wires and unscrew old timer; 3. Mount new timer. Match wires to original terminals using photo; 4. Reassemble panel, reinstall knob, plug in – ready to use immediately.
| Brand | Model Number |
|---|---|
| Admiral | AED4516HW0, AED4516MW0, AED4516MW1, AED4675EW0, AED4675YQ0, AED4675YQ1 |
| Amana | 4KNED3100JW0, 4KNED4605FW0, NED4600YQ0, NED4600YQ1, NED4655EW0, NED4655EW1, YNED4600YQ0, YNED4655EW0, YNED4655EW1 |
| Crosley | CED123SEW0, VED6505GW0, VDEW6511RW0 |
| Inglis | YIED4600YQ0, YIED4671DQ0, YIED4671EW0, YIED4671EW1 |
| Maytag | 4KMEDC215FW0, 4KMEDC410JW0 |
| Roper | RED4516FW0, RED4516FW1, RED4640YQ0, RED4640YQ1, RED4645EW0 |
| Whirlpool | 4KWED4605FW0, 4KWED5600JW0 |